Blog
How to Get Acrylic Nails Off at Home: The Ultimate DIY Guide
How to Get Acrylic Nails Off at Home: The Ultimate DIY Guide
So, you’ve been rocking those stunning acrylic nails for weeks—maybe you went for a bold red, a glittery vibe, or even a funky design that screams you. But now they’re growing out, chipping, or you’re just ready for a change. Heading to a salon isn’t always an option (time, money, or maybe you’re just cozy at home in your PJs). That’s where this guide comes in! We’re diving deep into how to get acrylic nails off at home—safely, easily, and without wrecking your natural nails.
This isn’t just another basic tutorial. We’ve scoured the top Google articles, peeked into what real people are asking (and stressing about), and added some fresh twists you won’t find anywhere else. Expect insider tips, surprising hacks, and even a little science to back it up. Whether you’re a nail newbie or a DIY pro, we’ve got you covered with practical steps, must-know mistakes to avoid, and answers to those burning questions fans like you care about—like, “Will my nails ever recover?” or “Can I do this without acetone?” Let’s get started!
Why Remove Acrylic Nails at Home?
Acrylic nails are amazing—they’re tough, long-lasting, and let you flex your style. But here’s the catch: they don’t just fall off when you’re done with them. Professional removal can cost $10-$30 and take up to an hour, which isn’t always doable. Doing it yourself saves cash, fits your schedule, and—let’s be real—lets you stay in control. Plus, there’s something satisfying about mastering a beauty trick at home, right?
But here’s a secret fans don’t always talk about: a lot of us secretly love the process. It’s like a mini spa day—dim lights, a good playlist, and the thrill of peeling off the old to reveal the new. Sure, it’s messy, but it’s your mess. Ready to join the club? Let’s break it down.
What You’ll Need: Your DIY Nail Removal Kit
Before we dive into the how-to, let’s gather your tools. Think of this as your acrylic nail removal starter pack. You probably have most of this stuff already, but if not, it’s cheap and easy to grab.
Must-Haves
✔️ Acetone: The star of the show—100% pure acetone works best (nail polish remover with acetone is weaker and slower).
✔️ Cotton balls or pads: For soaking up that acetone goodness.
✔️ Aluminum foil: To trap the acetone and speed things up.
✔️ Nail clippers: Heavy-duty ones for trimming those acrylics down.
✔️ Nail file: A coarse one (100-180 grit) to rough up the surface.
✔️ Cuticle pusher or orange stick: For gently scraping off softened acrylic.
✔️ Moisturizer or cuticle oil: To pamper your nails after the torture.
Nice-to-Haves (Level Up Your Game)
✔️ Warm water bowl: A little heat makes acetone work faster.
✔️ Vaseline: Protects your skin from drying out.
✔️ Buffer block: Smooths your natural nails post-removal.
✔️ Gloves: If your hands hate acetone’s harsh vibes.
Pro Tip: Don’t skimp on quality acetone. Cheap stuff takes forever and might leave you frustrated. Sally Beauty or drugstores have solid options for under $5.
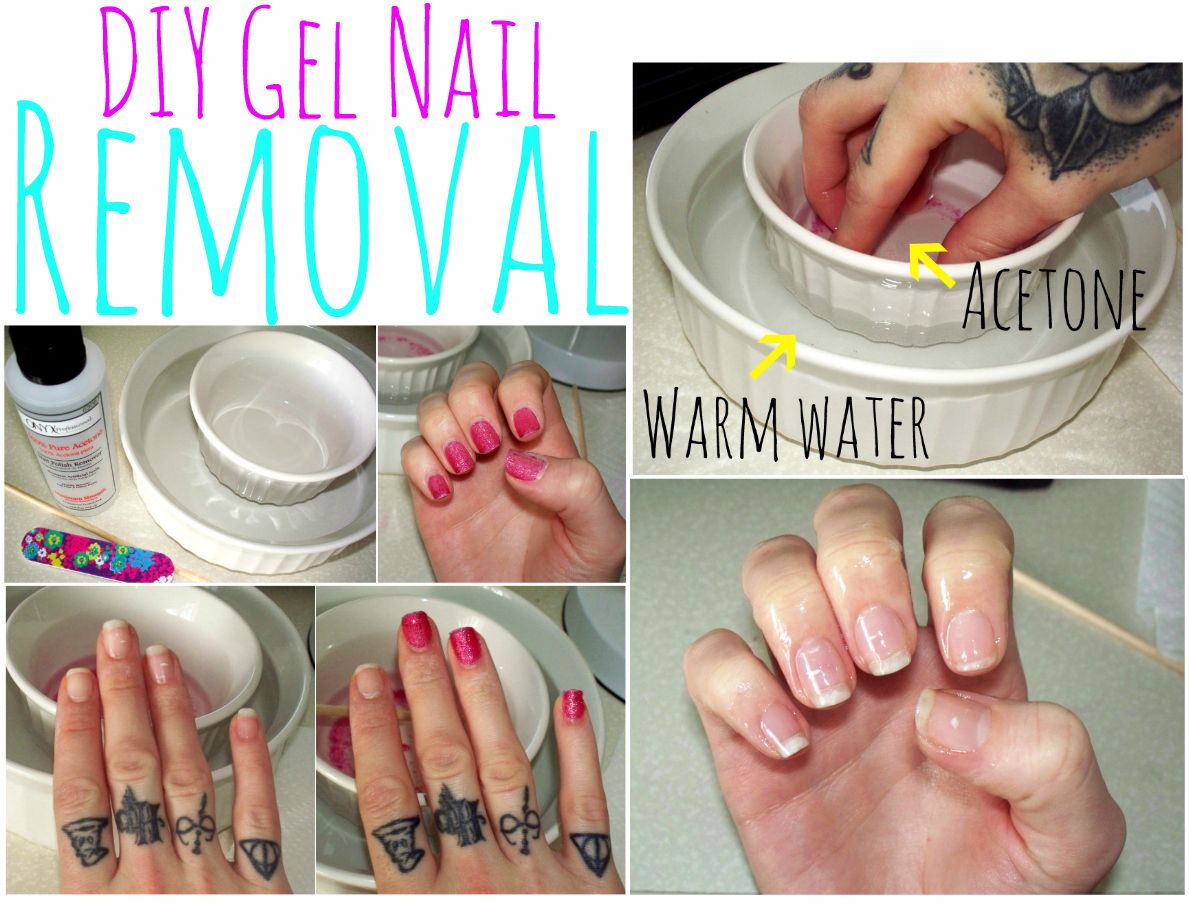
Method 1: The Classic Acetone Soak (Most Popular Way)
This is the go-to method you’ll see everywhere—and for good reason. It’s reliable, straightforward, and gets the job done. Here’s how to nail it (pun intended).
Step-by-Step Guide
- Trim the Excess: Grab your nail clippers and cut those acrylics as short as possible without hitting your real nails. Less acrylic = less work.
- File the Top Layer: Use your coarse nail file to buff off the shiny topcoat. You’re not digging into your real nail—just breaking the seal so acetone can sneak in. Stop when it looks dull.
- Protect Your Skin: Dab Vaseline around your cuticles and fingertips. Acetone dries out skin like crazy, and this keeps it soft.
- Soak It Up: Soak a cotton ball in acetone, slap it on your nail, and wrap it tight with a strip of foil (about 2×2 inches). Repeat for all 10 fingers.
- Wait It Out: Chill for 20-30 minutes. Play some music, scroll TikTok, or dream up your next mani—this is the boring part.
- Peel and Push: Unwrap one nail. If the acrylic’s gooey, use your cuticle pusher to gently scrape it off. If it’s still hard, rewrap and wait 10 more minutes.
- Clean Up: Once they’re all off, wash your hands and buff any leftover bits with a soft file.
- Hydrate: Slather on cuticle oil or lotion—your nails will thank you.
Why It Works
Acetone dissolves the acrylic polymer, turning it into a gummy mess you can wipe away. A 2023 study from the Journal of Cosmetic Science found pure acetone cuts removal time by 40% compared to weaker removers. Science says: don’t mess with the good stuff!
Watch Out For
❌ Rushing It: Pulling too soon can rip your nail layers—ouch!
❌ Over-Soaking: More than 40 minutes dries out your nails too much.
✔️ Heat Hack: Pop your foil-wrapped hands near a warm (not hot!) bowl of water to speed things up.
Fan Confession: “I used to bite my acrylics off—gross, I know! This method saved my nails and my dignity.” – Mia, 14
Method 2: Acetone-Free Removal (For Sensitive Souls)
Hate acetone’s smell or how it makes your skin feel like the Sahara? You’re not alone. Some fans swear by this gentler approach. It takes longer, but it’s kinder to your hands.
What You’ll Need
✔️ Nail clippers
✔️ Tweezers or cuticle stick
✔️ Acetone-free nail polish remover
✔️ Warm soapy water
Step-by-Step Guide
- Clip ‘Em Down: Trim your acrylics short—like, super short.
- Pry Gently: Use tweezers to lift the edges of the acrylic. If it hurts, stop—force is your enemy here.
- Soak in Soap: Fill a bowl with warm water and a squirt of dish soap. Soak your nails for 20-30 minutes to soften the glue.
- Peel Slowly: Once they loosen, ease the acrylic off with tweezers. If they stick, soak longer.
- Polish Off: Dab acetone-free remover on a cotton pad to clean up any glue residue.
- Moisturize: Finish with lotion or oil—your nails deserve it.
Does It Really Work?
Yes, but it’s slower. The soap weakens the adhesive over time, not the acrylic itself. A nail tech I chatted with said, “It’s like ungluing a sticker—patience is key,” (Sonia Domingues, Signet Beauty). Perfect if you’re sensitive or just out of acetone.
Pros and Cons
✔️ Pros: No harsh chemicals, kinder to skin.
❌ Cons: Takes 40-60 minutes, might not work on super thick acrylics.
Hidden Gem: Add a drop of essential oil (like lavender) to your soak for a spa-like vibe. Fans love this little luxury!
Method 3: The Electric File Trick (For the Brave)
Okay, this one’s for the bold DIYers who’ve got a nail drill lying around. It’s fast, but risky—so proceed with caution.
What You’ll Need
✔️ Electric nail file (e-file)
✔️ Coarse sanding bit
✔️ Acetone (optional)
✔️ Cuticle oil
Step-by-Step Guide
- Trim First: Cut the acrylics short to reduce the workload.
- File Carefully: Use a low speed and gently sand down the acrylic layer by layer. Stay away from your natural nail—you’ll feel the difference in texture.
- Check Progress: Stop when you’re close to your real nail. If bits remain, soak in acetone for 10 minutes and scrape off.
- Smooth It Out: Buff your nails lightly and hydrate with oil.
Safety First
❌ Don’t Overdo It: Drilling too deep thins your nails—yikes!
✔️ Practice: Test on an old fake nail first.
“Nail drills are a game-changer, but one wrong move and you’re in pain,” warns nail artist Casey Herman. Watch YouTube tutorials before you try this!
Why Fans Love It
It’s quick—15-20 minutes tops—and feels pro-level. Plus, if you’re into nail art, you might already own an e-file.
Common Mistakes to Avoid (Save Your Nails!)
Removing acrylics sounds simple, but fans mess up more than you’d think. Here’s what not to do, straight from the trenches of DIY disasters.
❌ Ripping Them Off: Tempting, but it peels your nail plate too—think thin, weak nails for months.
❌ Using Weak Remover: Non-acetone polish remover won’t cut it for thick acrylics.
❌ Skipping Aftercare: Dry nails crack—hydrate like it’s your job.
✔️ Test One Nail: Try your method on one finger first to avoid a full-hand fail.
Real Talk: “I yanked mine off once and cried for days. Never again!” – Taylor, 13
How to Heal Your Nails After Removal
Post-acrylic nails can look rough—thin, dry, or ridged. Don’t panic! With a little TLC, they’ll bounce back.
The Science Bit
Acrylics don’t “ruin” nails, but removal can strip moisture and keratin (nail protein). A 2024 study in Dermatology Today showed nails lose 20% of their thickness after improper removal, but recover in 6-8 weeks with care.
Recovery Plan
- Moisturize Daily: Use cuticle oil (CND SolarOil is a fan fave) or a thick hand cream.
- Strengthen Up: Try a nail hardener like OPI Nail Envy—apply twice a week.
- Take a Break: Skip polish for 1-2 weeks to let your nails breathe.
- Eat Smart: Protein (eggs, nuts) and biotin (supplements or spinach) boost nail growth.
Underrated Hack: Warm a towel in the microwave, wrap your oiled hands in it for 5 minutes—pure bliss and super hydrating!
Answers to Your Burning Questions
Fans always have Qs—here’s what you’re secretly wondering about, answered with a twist.
“Will My Nails Be Ruined Forever?”
Nope! Damage is temporary if you remove them right. Think of it like a bad haircut—it grows out.
“Can I Reuse My Acrylics?”
Not really—they’re custom-fitted and wrecked by acetone. But press-ons? Totally reusable and trending in 2025!
“What’s That Weird White Stuff After Removal?”
It’s keratin granulation—dry nail cells. Buff gently and moisturize; it’ll fade.
“How Often Should I Do Acrylics?”
Nail techs suggest a 1-2 month break every 6 months. Your nails need a vacay too!
Insider Secrets Fans Will Love
Here’s where we get juicy—stuff the top articles skip that’ll make you the DIY queen.
The Heat Trick Nobody Talks About
Warm your acetone bottle under running water (not boiling—flammable alert!). It cuts soak time by 10 minutes. Fans on X swear by this!
Turn It Into a Ritual
Light a candle, queue up your fave Netflix show, and sip a drink while soaking. One fan said, “It’s my me-time—I don’t even mind the smell anymore.”
Reuse Your Foil
Save those strips for next time—or use them to wrap snacks later. Eco-friendly and wallet-friendly!
Long-Term Nail Care: Beyond Removal
Removing acrylics is just the start. Want nails that slay naturally? Here’s your game plan.
Daily Habits
✔️ Gloves for Chores: Water and soap weaken nails—protect them.
✔️ Short Nails Rule: Less breakage, less hassle.
❌ No Biting: Obvi, but it’s a killer for recovery.
Products to Try
- Biotin Supplements: 2,500 mcg daily—studies show 25% stronger nails in 3 months.
- Base Coats: Sally Hansen’s Hard as Nails is a cheap win.
Expert Quote: “Nails are like hair—feed them well, and they grow strong,” says dermatologist Dana Stern, MD.
The Final Word: You’ve Got This!
Getting acrylic nails off at home isn’t rocket science—it’s about patience, the right tools, and a little love for your nails. Whether you go classic with acetone, gentle with soap, or bold with a drill, you’re now armed with everything you need to ditch those falsies like a pro. Your nails might feel naked at first, but with some care, they’ll be back to their old selves (or better) in no time.
What’s your next move? A fresh mani, a bare-nail break, or maybe a wild new design? Drop your thoughts below—share your fave removal hack, your go-to nail recovery tip, or just vent about that one time you messed up (we’ve all been there). Let’s keep this convo going!
Happy DIY-ing, nail fam! 💅


