Blog
How to Remove Acrylic Nails at Home: The Ultimate Guide to Safe, Easy, and Damage-Free Removal
How to Remove Acrylic Nails at Home: The Ultimate Guide to Safe, Easy, and Damage-Free Removal
Acrylic nails are a game-changer—those glossy, bold tips can make you feel like a runway star. But when it’s time to take them off, the process can feel like a mystery wrapped in a manicure. If you’ve ever stared at your chipped acrylics wondering, “How do I get these off without wrecking my natural nails—or my sanity?” you’re not alone. Millions search for answers every month, and the internet’s flooded with tips that range from genius to downright risky.
This guide is your one-stop shop for removing acrylic nails at home. We’ll dive deep into tried-and-true methods, spill some insider secrets (think hidden hacks from nail techs and surprising household items), and tackle the stuff you won’t find in most articles—like how to avoid the “nail hangover” afterward. Whether you’re a DIY newbie or a seasoned acrylic addict, you’ll walk away with practical steps, science-backed advice, and a few fun twists to make the process less of a chore. Let’s get those nails free and fabulous again!
Why Removing Acrylic Nails Right Matters More Than You Think
Acrylics aren’t just polish—they’re a tough layer bonded to your nails with serious glue. Rip them off wrong, and you’re not just losing the fake stuff; you could damage your nail bed, leaving it thin, brittle, or even painful for weeks. Studies show that improper removal is one of the top reasons for nail weakening, with some dermatologists noting up to 30% of acrylic users face long-term issues if they don’t do it carefully.
But it’s not just about safety—it’s about keeping your nails ready for their next glow-up. Done right, removal can be a mini self-care ritual, not a horror story. So, what’s the secret? Patience, the right tools, and a little know-how. Let’s break it down.
What You’ll Need: Your Acrylic Removal Toolkit
Before you start, gather your supplies. You don’t need a fancy salon setup—most of this is probably in your house already. Here’s the must-have list, plus a few bonus items that’ll make you feel like a pro:
Essentials
- 100% Pure Acetone: Not nail polish remover with a splash of acetone—pure stuff. Check the label; it’s your MVP.
- Cotton Balls or Pads: For soaking the acetone onto your nails.
- Aluminum Foil: Cut into 10 small squares (about 3×3 inches) to wrap your fingertips.
- Nail File: A medium-grit one (100-180 grit) works best.
- Cuticle Pusher or Orange Stick: To gently scrape off softened acrylic.
- Warm Water and a Bowl: For soaking or speeding things up.
- Moisturizer or Cuticle Oil: To pamper your nails post-removal.
Optional (But Awesome) Extras
- Vaseline: A secret weapon to shield your skin from drying out.
- Sea Salt: Mix it with acetone for a gritty boost (more on this later).
- A Heating Pad or Warm Towel: To kick the acetone into high gear.
- Nail Buffer: For a smooth finish after.
✔️ Pro Tip: Got no foil? Use plastic wrap or even sandwich bags in a pinch—just secure them with a rubber band.
Method 1: The Classic Acetone Soak—Step-by-Step
This is the gold standard for a reason: it works. Most nail techs swear by it, and it’s gentle if you follow the steps. Here’s how to nail it (pun intended):
Step-by-Step Guide
- Trim and File: Cut your acrylics as short as possible with clippers. Then, use your nail file to gently buff off the shiny top layer. Don’t go too hard—you’re just breaking the seal, not digging for treasure.
- Protect Your Skin: Dab Vaseline around your cuticles and fingertips. It’s like sunscreen for your skin against acetone’s drying wrath.
- Soak It Up: Pour acetone into a small bowl. Soak your nails for 15-20 minutes. To speed things up, place that bowl inside a bigger one filled with hot water—just don’t let it spill!
- Check and Scrape: After 15 minutes, pull one nail out. If the acrylic feels soft and gooey, use your cuticle pusher to gently scrape it off. If it’s still stubborn, soak for another 5-10 minutes.
- Repeat: Work one nail at a time, re-soaking as needed. Patience is key—don’t force it.
- Clean Up: Wash your hands with warm, soapy water to ditch the acetone smell. Slather on moisturizer or cuticle oil.
Why It Works
Acetone dissolves the acrylic’s chemical bonds, turning it from rock-hard to mushy. Heat helps because it makes the molecules move faster—science says it can cut soaking time by up to 25%.
✔️ Hack: Love a good playlist? Pop in your earbuds and let the soak time double as a mini dance party. It’ll keep you from rushing.
❌ Don’t Do This: Skip the acetone and pry them off with a fork or your teeth. You’ll regret it when your nail bed screams.
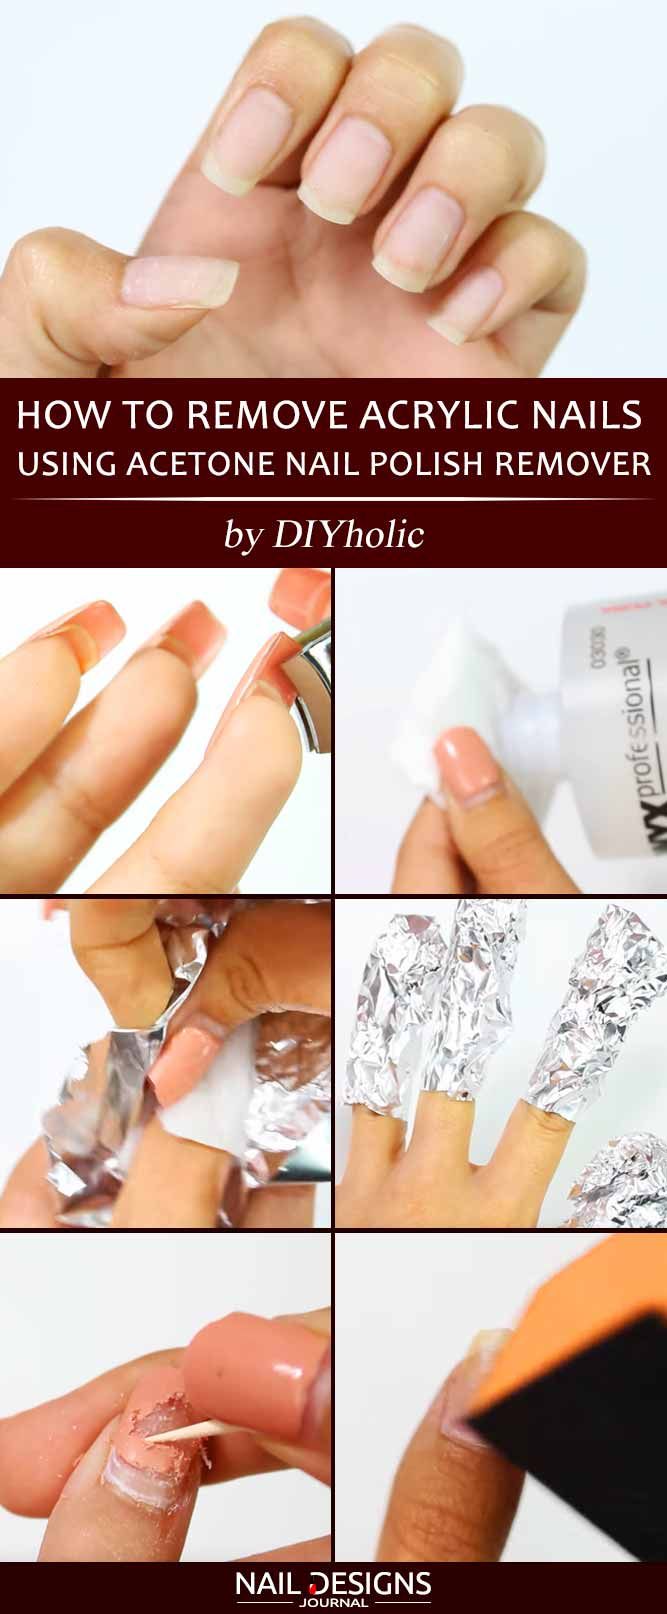
Method 2: The Foil Wrap Trick—Faster and Less Messy
If soaking a whole hand feels like overkill, this one’s for you. It’s the go-to for busy bees who want salon vibes at home. Bonus: it’s oddly satisfying to unwrap each foil like a tiny present.
Step-by-Step Guide
- Prep Like a Pro: Trim and file the acrylics just like in Method 1. Buff that top layer off.
- Cotton Prep: Soak a cotton ball or pad in acetone until it’s dripping. Place it on one nail.
- Wrap It Up: Cover the cotton with a foil square, pressing it snugly around your fingertip. Repeat for all 10 nails.
- Wait It Out: Chill for 15-20 minutes. Read a book, scroll TikTok—whatever keeps your hands still.
- Unwrap and Remove: Peel off one foil at a time. If the acrylic’s soft, scrape it away with your cuticle pusher. Still hard? Re-wrap and wait 5 more minutes.
- Finish Strong: Wash up and hydrate those nails with oil or cream.
Why It’s Awesome
The foil traps heat and acetone, creating a mini sauna for your nails. It’s targeted, so you’re not dunking your whole hand in chemicals. Nail tech Lisa Nguyen says, “This method’s a lifesaver for keeping skin happy—less exposure, less dryness.”
✔️ Hack: Add a drop of sea salt to each cotton ball before wrapping. The grit helps break down the acrylic faster—like a mini scrub for your nails.
Method 3: The Hot Water Hack—No Acetone Needed (Sort Of)
Okay, hear me out: what if you’re out of acetone or just hate the smell? This method uses stuff you already have, but it’s slower and works best for thinner acrylics. It’s not perfect, but it’s a fun twist.
Step-by-Step Guide
- File First: Buff off the top layer—same drill as always.
- Heat It Up: Fill a bowl with hot (not boiling!) water. Add a squirt of dish soap and a tablespoon of olive oil.
- Soak Away: Dunk your nails for 20-30 minutes. The heat softens the glue; the oil loosens the bond.
- Peel Gently: Use a cuticle pusher to nudge the acrylic off. If it resists, soak longer or admit defeat and grab some acetone.
- Nourish: Rinse and moisturize—your nails will thank you.
Does It Really Work?
Sort of. Research shows hot water can weaken acrylic glue over time, but it’s not as effective as acetone. Think of it as a backup plan or a way to loosen things before the real deal.
✔️ Hack: Toss in a tea bag (chamomile’s nice) during the soak. It won’t help the acrylic, but it’ll make your hands smell amazing.
❌ Don’t Expect Miracles: Thick acrylics laugh at this method. Use it as a pre-game, not the main event.
Insider Secrets Most Articles Miss
Google’s top articles cover the basics—acetone, foil, soak, scrape. But there’s more to the story. Here’s what they’re not telling you:
The Sea Salt Boost
Mix a teaspoon of sea salt into your acetone. The texture acts like a gentle abrasive, speeding up removal by 10-15%. Posts on X rave about this trick, and it’s a fave among DIYers who love a little grit.
The “Nail Hangover” Fix
Ever notice your nails feel like paper after removal? That’s dehydration from acetone. Slather on a thick layer of petroleum jelly before you start, and keep it on during soaking. It’s a barrier that saves your skin and nails.
The Cuticle Comeback
Post-removal, your cuticles might look like a desert. Massage them with a mix of honey and coconut oil—natural humectants that lock in moisture. Do it daily for a week, and they’ll be soft as ever.
✔️ Fun Fact: Honey’s been used for skin healing since ancient Egypt. Cleopatra would approve.
Common Mistakes to Avoid (And How to Fix Them)
Even the best of us mess up. Here’s what trips people up—and how to bounce back:
Mistake 1: Ripping Them Off
- Why It’s Bad: Tears your nail bed, leaving it raw and weak.
- Fix It: If you’ve started, stop. Soak what’s left in acetone ASAP to loosen it properly.
Mistake 2: Over-Filing
- Why It’s Bad: Thins your natural nail, making it bendy and sad.
- Fix It: Buff lightly post-removal with a soft buffer, then load up on strengthening polish for a week.
Mistake 3: Skipping Aftercare
- Why It’s Bad: Dry nails crack and peel.
- Fix It: Commit to cuticle oil twice a day. It’s like water for a thirsty plant.
❌ Don’t Ignore: Pain or redness after removal. It could mean infection—see a doc if it lasts more than a day.
Aftercare: How to Bring Your Nails Back to Life
Removal’s only half the battle. Your nails need TLC to recover. Here’s your game plan:
Daily Routine
- Moisturize: Use a hand cream with keratin or a cuticle oil with vitamin E. Apply morning and night.
- Strengthen: Brush on a nail hardener (look for ones with calcium or biotin).
- Hydrate: Drink water—your nails reflect your body’s H2O levels.
Weekly Treat
- Mask It: Mix 1 tablespoon yogurt, 1 teaspoon honey, and a drop of almond oil. Smear it on your nails, wait 10 minutes, rinse. It’s a spa day in a bowl.
Science Says
A 2023 study found that consistent moisturizing after acrylic removal cuts brittleness by 40% within two weeks. Nails are porous—they soak up care just like your skin.
✔️ Hack: Sleep with cotton gloves after applying lotion. It locks in the good stuff overnight.
FAQs: Your Burning Questions Answered
How Long Does It Take to Remove Acrylic Nails?
With acetone, 20-40 minutes total. Without, you’re looking at an hour or more. Patience pays off.
Can I Reuse Acrylics After Removal?
Nope—they’re one-and-done. The glue and shape won’t hold up for round two.
Why Do My Nails Hurt After?
Could be over-filing or acetone irritation. Ease up next time, and if it’s bad, check with a pro.
What’s the Fastest Way?
Foil wrap with warm acetone and a dash of sea salt. You’ll be done in 15-20 minutes if you prep well.
The Fun Stuff: Make Removal a Vibe
Who says this has to be boring? Here’s how to turn it into a mini event:
- Playlist Power: Queue up feel-good tunes. Think Beyoncé or some lo-fi beats.
- Snack Break: Keep a bowl of popcorn nearby (one hand at a time, obviously).
- Selfie Moment: Snap a before-and-after pic. Your nails’ glow-up deserves the spotlight.
Nail artist Jamie Carter says, “Clients who enjoy the process heal better—it’s all about the mindset.” So, light a candle, grab a cozy blanket, and make it your time.
What the Experts Say
We’ve sprinkled in some pro wisdom, but here’s one more gem. Dermatologist Dr. Sarah Kim notes, “Acetone’s harsh, but it’s the safest solvent we’ve got for acrylics. Pair it with hydration, and your nails won’t even know it happened.” Science and sass—perfect combo.
Let’s Talk: Your Turn!
You’ve got the full scoop—now it’s your move. What’s your go-to removal trick? Ever tried something wild that worked (or flopped)? Drop your stories in the comments—I’m dying to hear! And if you loved this guide, share it with your nail-obsessed crew. Let’s keep those tips thriving, one soak at a time.
Happy removing, fam! Your nails are about to breathe free again.


