Blog
How to Remove Shellac Nail Polish: A Complete Guide to Doing It Right at Home
How to Remove Shellac Nail Polish: A Complete Guide to Doing It Right at Home
Hey there, nail lovers! If you’re rocking a glossy shellac manicure but noticing it’s time for a change—whether it’s chipping, growing out, or you’re just craving a new color—this guide is for you. Shellac nail polish is a fan favorite because it lasts weeks, shines like a dream, and doesn’t budge easily. But when it’s time to take it off, things can get tricky. You might be tempted to peel it off (don’t—we’ll get to why later!) or wonder if you can skip the salon and do it yourself. Spoiler alert: You totally can!
This isn’t just another how-to article. We’re diving deep—think insider tips, surprising facts, and practical hacks you won’t find everywhere. Ever wondered why acetone smells so strong or how your nails feel after removal? Curious about what nail techs secretly wish you knew? We’ve got you covered with a step-by-step plan, fun extras, and even some science to back it up. Let’s get those nails free and fabulous again!
What Exactly Is Shellac Nail Polish?
Before we jump into removal, let’s talk about what makes shellac special. Shellac is like the superhero of nail polish—a hybrid of gel and traditional polish. It’s cured under a UV or LED lamp, which is why it sticks around for 2-3 weeks without chipping. Unlike regular polish, it’s tougher to remove, but that’s also why it’s so durable.
Here’s a fun fact: Shellac was created by a company called CND (Creative Nail Design), and it’s technically a brand name. But just like we call all tissues “Kleenex,” “shellac” has become the catch-all term for this type of mani. Pretty cool, right? Knowing this helps you understand why removal isn’t as simple as swiping some regular polish remover.
Why Removal Matters
Taking off shellac the wrong way can leave your nails dry, brittle, or even damaged. Peeling it off might feel satisfying (admit it, we’ve all tried!), but it often rips off layers of your natural nail too. So, let’s do this right and keep your nails healthy for the next mani adventure.
Why You Shouldn’t Peel Shellac Off (And What Happens If You Do)
Okay, confession time: Have you ever sat there picking at your shellac when it starts lifting at the edges? It’s tempting—like peeling a sunburn or popping bubble wrap. But here’s the tea: Peeling shellac can seriously mess up your nails.
When you peel, you’re not just removing polish—you’re tearing off bits of your nail plate. That’s the hard, protective layer on top. Over time, this makes your nails thin, weak, and prone to breaking. A 2019 study from the Journal of Cosmetic Dermatology found that improper nail polish removal (especially peeling) can weaken the nail structure by up to 20% over repeated attempts. Yikes!
What It Looks Like
- After Peeling: Nails might look white, flaky, or feel rough—like sandpaper.
- Long-Term: They could split or crack more easily, ruining your next mani.
Pro Tip from a Nail Tech
Lucy Mackenzie, a nail expert from blow LTD, once said, “Peeling shellac is like pulling the top layer off a cake—you’re left with a mess that’s hard to fix.” She’s so right! Let’s avoid the mess and go for a gentler method.
The Two Main Ways to Remove Shellac at Home
Good news: You don’t need a salon to say goodbye to shellac. There are two tried-and-true methods you can do at home: the soak-off method and the foil-wrap method. Both use acetone, but they’re a little different in how they work. Let’s break them down so you can pick what fits your vibe.
Method 1: The Soak-Off Method
This is the chill, hands-in-a-bowl approach. It’s simple and feels a bit like a mini spa moment—minus the fancy music.
What You’ll Need
- A shallow bowl (big enough for your fingertips)
- Pure acetone (or a remover with at least 60% acetone)
- Cuticle oil
- A nail file (optional)
- Cotton balls or pads
- A towel (to protect your table)
Step-by-Step Guide
- Prep Your Space: Lay down a towel. Acetone can strip varnish off furniture faster than you can say “oops!”
- File the Top Layer (Optional): Gently buff the shiny topcoat with a nail file. This helps the acetone sink in quicker. Don’t overdo it—just a light scratch.
- Add Cuticle Oil: Rub some around your nails. It protects your skin from drying out.
- Pour the Acetone: Fill the bowl with about half an inch of acetone. Dip your fingertips in, keeping your nails submerged.
- Soak for 10-15 Minutes: Relax! Watch a YouTube video or scroll TikTok. The shellac will start flaking off.
- Wipe It Away: Use a cotton ball to gently rub off the softened polish. If it’s stubborn, soak a bit longer.
- Moisturize: Wash your hands, then slather on more cuticle oil or hand cream.
✔️ Pros
- Super easy and low-effort
- Feels kinda relaxing
- No fiddling with foil
❌ Cons
- Exposes more skin to acetone
- Takes a little longer
Method 2: The Foil-Wrap Method
This one’s a bit more hands-on but faster and targeted. It’s what most pros use at salons.
What You’ll Need
- Cotton balls or pads (cut into nail-sized pieces)
- Acetone
- Aluminum foil (cut into 10 small squares)
- Cuticle oil
- A nail file
- An orange stick or cuticle pusher
- A towel
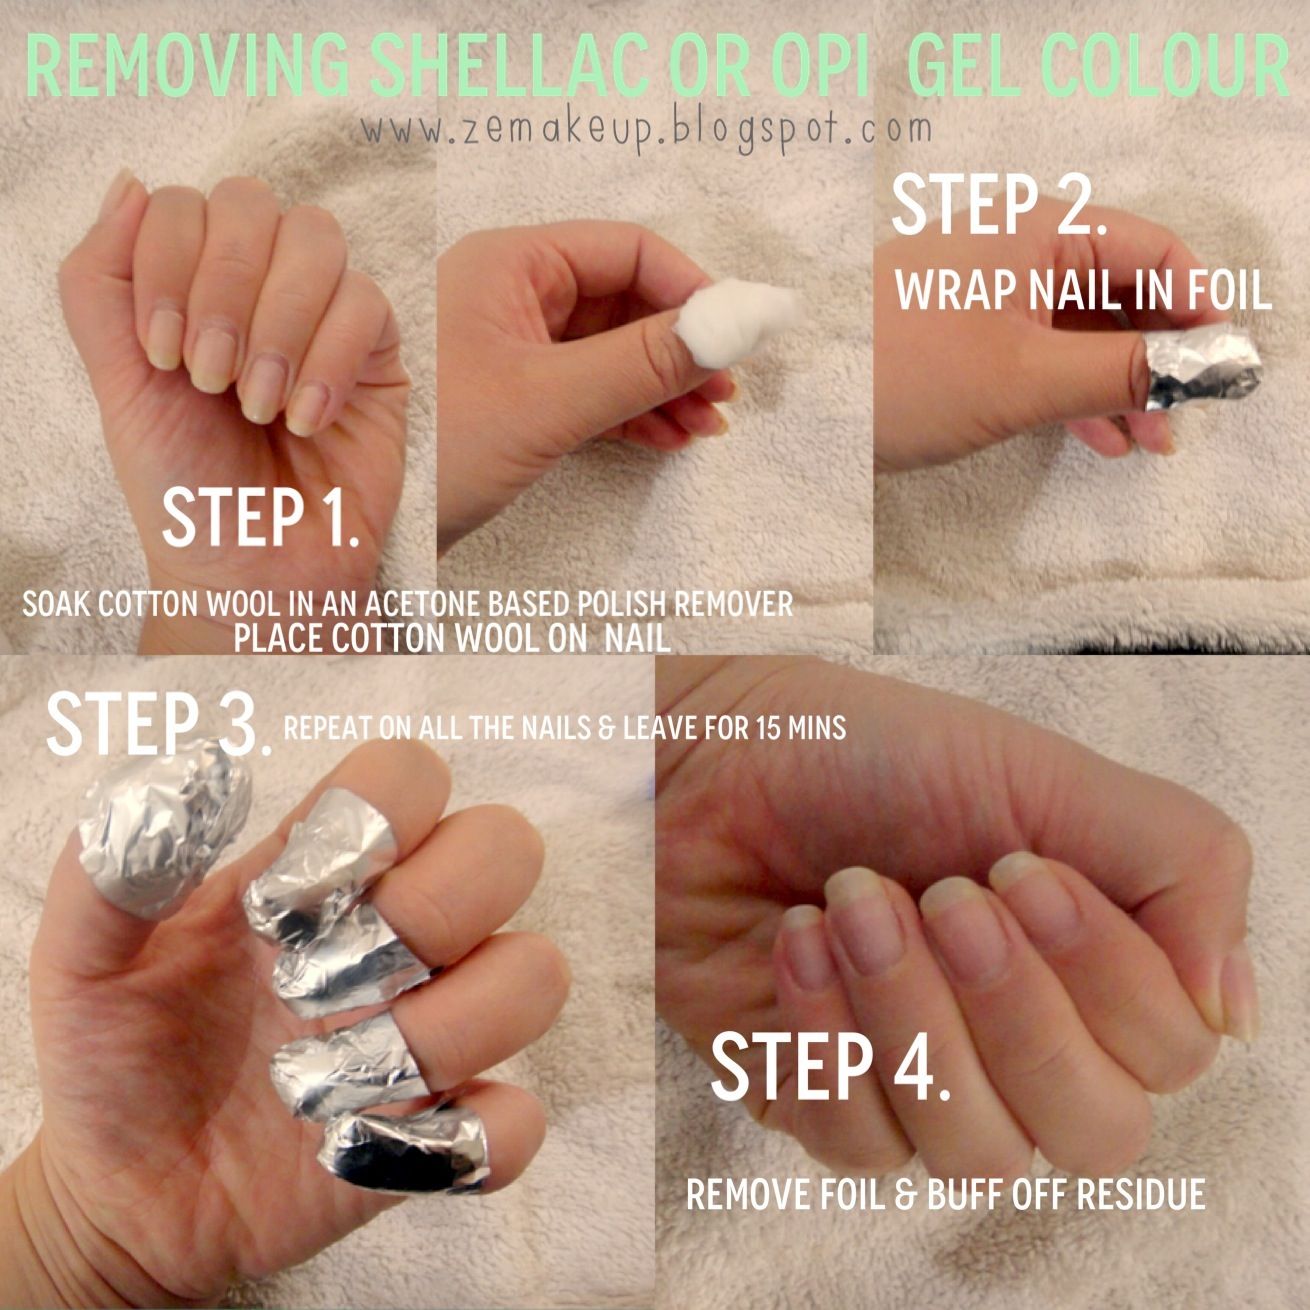
Step-by-Step Guide
- Set Up: Cover your table with a towel. Cut your foil and cotton pieces ahead of time.
- Buff the Surface: Lightly file the topcoat to break the seal.
- Apply Cuticle Oil: Rub it around your nails for protection.
- Soak the Cotton: Wet each cotton piece with acetone—damp, not dripping.
- Wrap It Up: Place a cotton piece on each nail, then wrap with foil to hold it tight.
- Wait 10 Minutes: Let the acetone work its magic. You might feel a little warmth—that’s normal!
- Unwrap and Remove: Take off the foil one nail at a time. Use the cotton or an orange stick to gently push off the shellac. If it sticks, re-wrap and wait 5 more minutes.
- Finish Up: Wash your hands and moisturize like crazy.
✔️ Pros
- Faster and more precise
- Less acetone on your skin
- Feels pro-level
❌ Cons
- Takes more prep
- Foil can be fiddly
Which One’s for You?
- Short on Time? Go foil-wrap.
- Want to Chill? Try soaking.
- First Timer? Start with foil—it’s easier to control.
Acetone 101: What You Need to Know
Acetone is the MVP of shellac removal, but it’s got a reputation. That strong smell? It’s a solvent breaking down the polish’s tough bonds. Here’s the scoop:
Is It Safe?
Yes, but sparingly. Acetone dries out skin and nails, which is why cuticle oil is your BFF here. A 2021 study in Dermatology Reports showed that prolonged acetone exposure can reduce nail moisture by 15-20%—not a dealbreaker, but worth protecting against.
Pure vs. Polish Remover
- Pure Acetone: Found at drugstores or hardware stores. Works fastest but dries more.
- Nail Polish Remover: Look for 60%+ acetone. Slower but gentler, often with added moisturizers.
Fun Fact
Acetone isn’t just for nails—it’s in paint thinner too! That’s why it’s so good at dissolving shellac’s gel-like structure.
What If You Don’t Have Acetone? (Alternative Hacks)
No acetone? No panic! These alternatives aren’t as fast, but they can work in a pinch. Heads up: They’re not as effective, so patience is key.
Option 1: Vinegar + Lemon Juice
- How: Mix equal parts in a bowl, soak for 20-30 minutes, then scrape with an orange stick.
- Why: The acidity breaks down polish slowly.
- Downside: Smells funky and takes forever.
Option 2: Rubbing Alcohol
- How: Soak cotton balls in isopropyl alcohol (70%+), wrap with foil, wait 20 minutes.
- Why: It’s a solvent, just weaker than acetone.
- Downside: Might not fully remove thicker layers.
Option 3: Let It Grow Out
- How: File down the shellac weekly as your nails grow, then clip off the tips.
- Why: Zero chemicals, all natural.
- Downside: Takes weeks and looks messy.
Reality Check
These hacks are last resorts. Acetone’s still the gold standard for a clean, quick removal.
Common Mistakes to Avoid (And How to Fix Them)
Even with the best plan, things can go sideways. Here’s what trips people up—and how to dodge it.
Mistake 1: Picking or Scraping Too Hard
- Why It’s Bad: Damages your nail bed.
- Fix: If shellac won’t budge, soak longer. Use an orange stick gently.
Mistake 2: Skipping Moisturizer
- Why It’s Bad: Dry nails crack easily.
- Fix: Keep cuticle oil or cream handy. Apply twice daily post-removal.
Mistake 3: Using Too Much Acetone
- Why It’s Bad: Over-soaking dries skin unnecessarily.
- Fix: Stick to 10-15 minutes max. Less is more!
Post-Removal Nail Care: Bring Your Nails Back to Life
Your nails might feel a little sad after shellac comes off—dry, rough, or weak. Let’s pamper them back to health.
Step 1: Hydrate, Hydrate, Hydrate
- Why: Acetone strips moisture.
- How: Use a thick hand cream (like CeraVe or O’Keeffe’s) and cuticle oil daily. Bonus points if it’s got vitamin E or jojoba oil.
Step 2: Strengthen Them
- Why: Removal can thin nails temporarily.
- How: Apply a nail strengthener (like Sally Hansen Hard as Nails) for a week or two.
Step 3: Give Them a Break
- Why: Nails need recovery time.
- How: Skip polish for 3-5 days. Let them breathe!
Expert Insight
Nail tech Samantha Kendrew from Mii Cosmetics says, “Post-removal care is like a reset button for your nails. Hydration is everything.” She’s spot-on—don’t skip this!
Fun Shellac Removal Hacks Fans Love
Want to make this less of a chore? Here’s what nail buffs swear by:
- Warm It Up: Soak your hands in warm water before starting. It softens the polish a tad.
- Music Vibes: Play your favorite playlist. 10 minutes flies by with good tunes!
- Foil Trick: Add a drop of cuticle oil to the cotton before wrapping. It doubles as a mini treatment.
Shellac vs. Gel: What’s the Difference for Removal?
People mix these up all the time, so let’s clear it up. Shellac is a type of gel polish, but not all gels are shellac. Here’s how it affects removal:
| Feature | Shellac | Regular Gel |
|---|---|---|
| Formula | Hybrid polish-gel | Pure gel |
| Removal Time | 10-15 mins | 15-20 mins |
| Difficulty | Easier | Trickier (thicker) |
| Damage Risk | Lower | Higher if forced |
Takeaway: Shellac’s hybrid nature makes it a bit friendlier to remove. Lucky us!
Insider Secrets Nail Techs Wish You Knew
Ever wonder what pros think when they see DIY removal fails? Here’s the scoop:
- They Hate Peeling Too: It’s the #1 thing they fix at salons.
- Foil Size Matters: Too big, and it slips off; too small, and it doesn’t cover. Aim for 2×2 inches.
- Acetone Smell Hack: Add a drop of essential oil (like lavender) to the cotton. It masks the scent!
Christine Thompson, a seasoned manicurist, told us, “Clients who prep with oil save their nails—and my sanity!” Love that honesty.
Long-Tail Keywords to Explore
Not sure what to search next? Here are some ideas people ask about:
- How to remove shellac nail polish without acetone
- Best way to take off shellac at home
- Does shellac damage nails when removed
- How to remove shellac nail polish safely
- Fastest shellac removal method
We’ve covered these and more, so you’re ahead of the game!
The Science Behind Healthy Nails After Removal
Let’s geek out for a sec. Your nails are made of keratin, a tough protein. Acetone dissolves the shellac by breaking its bonds, but it also pulls water from your nails. That’s why they feel dry after. Studies show keratin can lose up to 10% of its strength with repeated acetone use without care.
How to Fight Back
- Protein Boost: Use a keratin-infused strengthener.
- Water Lock: Moisturize to replace what’s lost.
Your Questions, Answered
Got Qs? We’ve got As!
Q: Can I reuse the foil?
- A: Yep, as long as it’s clean and not torn. Save some cash!
Q: Why do my nails feel soft after?
- A: Acetone temporarily softens keratin. It’ll firm up in a day or two with care.
Q: How often is too often for shellac?
- A: Give your nails a week off every 2-3 months to avoid over-drying.
Let’s Chat: Your Turn!
You’ve got the full rundown—now it’s your turn to weigh in! Have you tried removing shellac at home? Got a hack we missed? Drop it in the comments below. Or tell us: What’s your go-to nail look after removal—bare, bold, or glittery? Let’s keep the convo going—I’ll reply to every comment!
And there you have it—a mega-guide to removing shellac nail polish like a pro, with all the juicy details and fan-fave extras. Your nails are ready for their next chapter. Happy polishing!


