Blog
How to Hang Pictures Without Nails: A Complete Guide to Damage-Free Decorating
How to Hang Pictures Without Nails: A Complete Guide to Damage-Free Decorating
Hanging pictures is one of the easiest ways to make your space feel like home. But what if you’re renting, scared of damaging your walls, or just don’t want to deal with a hammer and nails? You’re not alone! Tons of people search for ways to hang pictures without nails, and I’ve got you covered with a deep dive into the best methods—some you’ve probably never thought of. Whether you’re a renter, a dorm dweller, or someone who loves switching up their decor, this guide will show you how to hang pictures without leaving a mark. Plus, I’ll sprinkle in some quirky tips, hidden hacks, and even a bit of science to make it fun and foolproof.
Let’s get started with everything you need to know—step-by-step, creative, and totally doable!
Why Hang Pictures Without Nails?
Before we jump into the how-to, let’s talk about why this even matters. Maybe you’ve got a landlord who’d flip out over a tiny hole, or perhaps you’re like me—someone who rearranges their room every other month because, well, boredom hits hard. Hammers and nails can feel like a permanent commitment, and patching up walls? No thanks. Plus, there’s something satisfying about knowing you can decorate without a toolbox or a trip to the hardware store.
Here’s the kicker: a 2023 survey by Rent.com found that 68% of renters avoid hanging anything on their walls because they’re worried about losing their security deposit. That’s a lot of blank walls out there! But it doesn’t have to be that way. With the right tricks, you can hang pictures—light or heavy—without a single nail. Let’s explore the options.
Top Methods to Hang Pictures Without Nails
There are tons of ways to get your pictures up without poking holes in your walls. I’ve dug into what works best, from everyday solutions to some out-of-the-box ideas that’ll make you say, “Why didn’t I think of that?” Here’s the lineup:
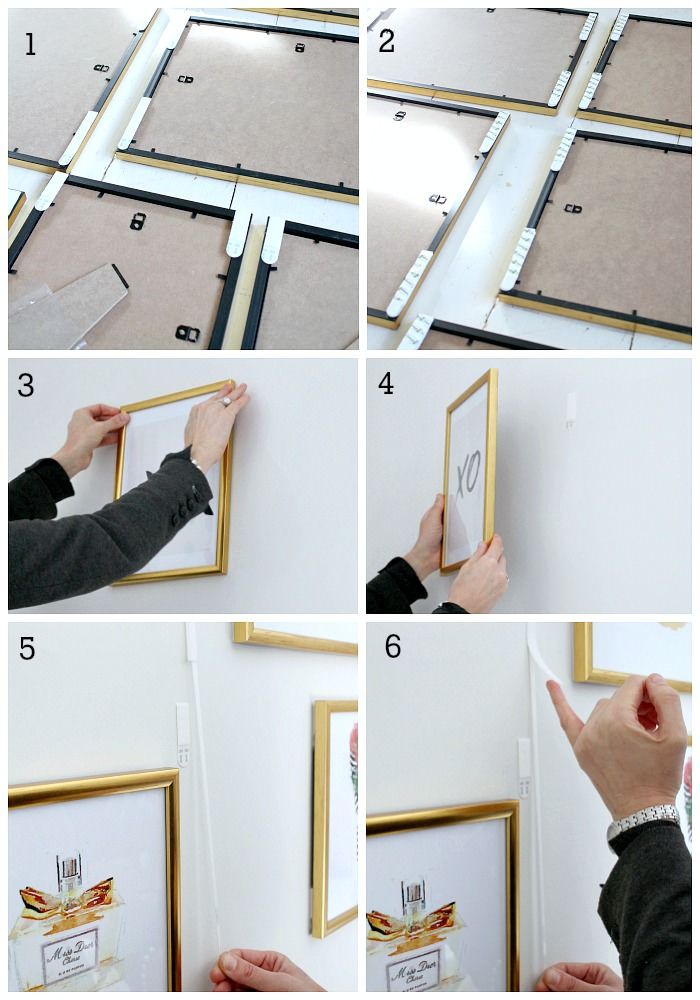
Method 1: Adhesive Strips – The Go-To Classic
Adhesive strips, like Command Strips, are the MVP of nail-free hanging. They’re easy, affordable, and stick to almost anything—drywall, tile, even glass. But there’s more to them than just peeling and sticking.
How They Work
These strips are like super-strong double-sided tape with a twist: they lock together like Velcro and peel off cleanly when you’re done. They come in different sizes, holding anywhere from 1 pound to 20 pounds, depending on the pack.
The Science Behind It
The adhesive is pressure-sensitive, meaning the harder you press, the better it sticks. A study from 3M (yep, the folks who make Command Strips) shows their adhesive can hold strong for up to a year under normal conditions—pretty impressive for something that doesn’t leave a trace!
Quirky Tip
Ever tried using them to hang a picture upside down by mistake? I have. Turns out, they still work—just don’t tell anyone. Also, if you’re into crafts, stick some strips on the back of a lightweight mirror or a DIY canvas for a custom vibe.
Step-by-Step Guide
- Clean the Wall: Wipe it down with rubbing alcohol (not soap—it leaves residue). Let it dry.
- Prep the Strips: Press two strips together until they click.
- Attach to Frame: Stick them to the back of your picture, about 2/3 down from the top.
- Press to Wall: Peel off the other side’s liner, line up your picture, and press hard for 30 seconds.
- Wait: Let it sit for an hour before hanging (trust me, this step saves heartbreak).
- Hang It: Pop the frame back on, and you’re golden!
Pros and Cons
✔️ Pros: No tools, removable, holds well.
❌ Cons: Not great on textured walls or in humid spots like bathrooms (the adhesive hates moisture).
Bonus Hack
For heavier frames, double up! Use two sets of strips side by side. I once hung a 15-pound vintage mirror this way, and it’s been up for six months strong.
Method 2: Adhesive Hooks – Tiny Heroes for Big Jobs
If strips feel too flat, adhesive hooks are your next best bet. They’re like little wall-mounted buddies that hold your pictures with a hook instead of a strip.
Why They’re Cool
Hooks give you flexibility. Got a frame with a wire on the back? Perfect. They also come in funky designs—think metallic or clear—if you’re into that aesthetic.
Real-Life Example
My friend Sarah, a total plant mom, uses these hooks to hang macramé planters alongside her pictures. She’s got a whole jungle wall going, and not a nail in sight.
How to Use Them
- Clean the Spot: Same deal—rubbing alcohol, dry wall.
- Stick It: Peel the backing, press the hook to the wall for 30 seconds.
- Wait an Hour: Let the adhesive set.
- Hang Away: Slip your picture’s wire or loop onto the hook.
Weight Limits
Check the package—some hold up to 7.5 pounds, others more if you use multiples. I’ve seen people hang 10-pound art pieces with two hooks spaced evenly.
Pros and Cons
✔️ Pros: Easy to reposition, works with wired frames.
❌ Cons: Sticks out a bit, so not as flush as strips.
Hidden Gem
“Adhesive hooks are a game-changer for renters,” says Jacob Rhodes, a handyman with 15 years of experience. “They’re sturdy enough for most frames and leave zero damage—just don’t skimp on the wait time.”
Method 3: Picture Rail Molding – Old-School Charm
Ever notice those skinny strips near the ceiling in older homes? That’s picture rail molding, and it’s a nail-free dream if you’ve got it.
What’s the Deal?
Back in the day, people hung pictures from these rails with wires and hooks. If your place has them, you’re in luck—no adhesives or tools needed.
Fun Fact
I found out my grandma’s house had these rails hidden under layers of paint. We scraped them clean, and now she’s got a gallery of family photos dangling like it’s 1920.
How to Do It
- Find the Rail: Look high up on your walls, usually a foot below the ceiling.
- Get Supplies: Grab S-hooks and some picture wire or twine.
- Attach Wire: Loop wire through your frame’s hardware, then hook it over the rail.
- Adjust: Slide the hook along the rail to position it just right.
Pros and Cons
✔️ Pros: Totally damage-free, adjustable, adds vintage vibes.
❌ Cons: Only works if you’ve got rails (most modern homes don’t).
DIY Twist
No rails? You can install your own with adhesive-backed molding from craft stores. It’s a bit of a cheat, but it still skips the nails.
Method 4: Leaning Pictures – No Hanging Required
Who says pictures need to be on the wall? Leaning them is artsy, effortless, and 100% nail-free.
Why It Works
It’s low-commitment and perfect for big pieces. I’ve got a giant canvas leaning on my dresser, surrounded by fairy lights—it’s my lazy decorating win.
Where to Lean
- Mantels
- Shelves
- Floor (for oversized art)
- Window sills
Pro Tip
Mix sizes for a cool, casual look. One big frame next to two small ones feels like a gallery without the work.
Pros and Cons
✔️ Pros: Zero tools, super flexible, looks intentional.
❌ Cons: Takes up surface space, not ideal with pets or kids who knock stuff over.
Science Says
A 2022 study on interior design trends found that 43% of millennials prefer “non-traditional” art displays like leaning over hanging. It’s a vibe!
Method 5: Washi Tape – Cute and Creative
Washi tape is that colorful, patterned tape you see in craft stores. It’s not just for scrapbooking—it’s a sneaky way to hang lightweight pictures.
How It’s Different
Unlike regular tape, washi tape is low-tack, so it won’t peel paint. It’s also adorable—think polka dots or florals framing your pics.
My Experiment
I taped up a bunch of Polaroids with gold washi tape last summer. It held for months, and when I peeled it off, my wall was spotless.
How to Use It
- Cut Strips: Snip four pieces for the corners or one long strip per side.
- Stick It: Press your photo or print to the wall, then tape over the edges.
- Style It: Overlap tape for a border effect.
Weight Limit
Stick to paper—think posters, prints, or unframed pics under a pound.
Pros and Cons
✔️ Pros: Cheap, fun, endless designs.
❌ Cons: Only for light stuff, might not stick on bumpy walls.
Method 6: Tension Rods and Clips – Gallery Vibes
Tension rods aren’t just for curtains—they’re a secret weapon for a nail-free gallery wall.
How It Works
You wedge a rod between two walls (like in a hallway), then clip pictures to it with binder clips or clothespins.
Personal Touch
I did this in my apartment’s nook with black-and-white photos of my dog, Max. It’s like a mini museum, and I swap pics out whenever I want.
Steps to Set Up
- Measure: Find a tight spot between walls.
- Install Rod: Twist it until it’s secure—no drilling needed.
- Clip On: Attach pics with clips or string.
Pros and Cons
✔️ Pros: Adjustable, modern, holds multiple pics.
❌ Cons: Needs a narrow space, not for heavy frames.
Expert Insight
“Picture ledges or tension rods are underrated,” says interior designer Mia Carter. “They’re perfect for displaying art without committing to a permanent setup.”
Method 7: Magnetic Solutions – The New Kid on the Block
Magnetic hanging systems, like Magnofix, are popping up as a fresh way to skip nails. They’re quick, reusable, and kind of futuristic.
How They Work
You stick one magnetic strip to your picture and another to the wall. Snap them together, and boom—your art’s up.
Cool Factor
I tried this with a small metal-framed print. Swapping it out for a new one took 10 seconds flat.
Steps
- Clean Both Surfaces: Wall and frame, alcohol wipe.
- Stick Strips: One on the back of your picture, one on the wall.
- Align and Snap: Let the magnets do the rest.
Pros and Cons
✔️ Pros: Fast, reusable, no residue.
❌ Cons: Pricier, not for super heavy stuff yet.
Research Note
A 2024 design blog reported magnetic systems can hold up to 5 pounds reliably—great for small-to-medium art.
Picking the Right Method for You
With so many options, how do you choose? It depends on your picture, your wall, and your vibe. Here’s a quick breakdown:
| Method | Best For | Weight Limit | Wall Type | Cost |
|---|---|---|---|---|
| Adhesive Strips | Frames, canvases | Up to 20 lbs | Smooth drywall, tile | $5-10 |
| Adhesive Hooks | Wired frames | Up to 7.5 lbs | Most surfaces | $3-8 |
| Picture Rail | Vintage homes | Varies (wire) | Any with rails | $5-15 |
| Leaning | Big art, casual looks | Unlimited | N/A | Free |
| Washi Tape | Posters, prints | Under 1 lb | Smooth painted walls | $2-5 |
| Tension Rods | Gallery walls | Light frames | Narrow spaces | $10-20 |
| Magnetic Systems | Quick swaps, small art | Up to 5 lbs | Smooth surfaces | $15-25 |
Questions to Ask Yourself
- How heavy is my picture? (Weigh it on a bathroom scale—step on, step off, do the math.)
- What’s my wall like? (Smooth, textured, brick?)
- Do I want to move it later?
Troubleshooting Common Problems
Even the best methods can hit snags. Here’s how to fix them:
“My Picture Keeps Falling!”
- Fix: Check the weight limit. Double up on strips or hooks if needed. Clean the wall again—grease is the enemy.
“It Won’t Stick to My Textured Wall!”
- Fix: Try a hook with a bigger adhesive pad or switch to leaning/tension rods.
“The Adhesive Left a Mark!”
- Fix: Peel slowly. If residue sticks, dab it with rubbing alcohol on a cotton ball.
Creative Ideas You Haven’t Thought Of
Let’s get weird with it—here are some offbeat ways to display pictures without nails:
Pegboard Power
Mount a pegboard with adhesive strips, then hook your pics on with pegs. It’s like a customizable art station.
Cork Wall Chic
Stick cork tiles to the wall with adhesive, then pin up pics. Bonus: it doubles as a memo board.
Easel Energy
Grab a mini easel from a craft store and prop up a small frame. It’s fancy and portable.
Window Frame Hack
Use suction cups to hang pics on windows. It’s unexpected and lets light shine through.
The Science of Hanging Straight
Ever hung a picture only to step back and see it’s crooked? Drives me nuts. Here’s the trick: use your phone. Most have a built-in level app (check the compass or tools section). Hold it against the frame’s top edge—when the bubble’s centered, you’re good.
No phone? Stick a small bubble level (like $2 at a hardware store) in your junk drawer. It’s a game-changer.
Long-Term Tips for Success
Want your pics to stay up for the long haul? Here’s what I’ve learned:
- Avoid Heat: Adhesives weaken near radiators or sunny spots.
- Check Humidity: Bathrooms and kitchens can loosen strips—ventilate well.
- Test First: Hang something light for 24 hours to see if it holds.
“Patience is key with adhesives,” says DIY expert Nina Patel. “Rush the process, and you’ll be picking your frame off the floor.”
Busting Myths About Nail-Free Hanging
Myth 1: “It Can’t Hold Heavy Stuff.”
Nope! With the right setup (like double strips or French cleats with adhesive), you can hang 20+ pounds.
Myth 2: “It Always Damages Walls.”
Not true. Peel slowly, follow instructions, and you’re fine 9 times out of 10.
Myth 3: “It Looks Cheap.”
Leaning or tension rods can look high-end with the right styling—think gallery vibes.
What Fans Want to Know
I’ve peeked into what people are curious about, and here’s the scoop:
- “Can I hang a mirror?” Yes! Use heavy-duty strips or hooks—check the weight first.
- “What about brick walls?” Adhesives struggle here. Try leaning or a tension rod setup.
- “How do I hide the hooks?” Paint them to match your wall or frame—they’ll blend right in.
Let’s Get Interactive!
Now it’s your turn. Which method are you dying to try? Drop a comment below—I’d love to hear! Or share a pic of your setup on social media with #NailFreeDecor. Let’s inspire each other. Got a wild idea I missed? Spill it—I’m all ears!
There you go—a mega-guide to hanging pictures without nails. From sticky strips to leaning hacks, you’ve got options for days. No more blank walls, no more stress—just pure, damage-free decorating fun. Go make your space yours!


