Blog
How to Soak Off Gel Nails: A Complete Guide for a Damage-Free DIY Manicure Removal
How to Soak Off Gel Nails: A Complete Guide for a Damage-Free DIY Manicure Removal
Hey there, nail lovers! So, you’ve rocked that shiny gel manicure for weeks, and now it’s time to say goodbye. Whether your polish is starting to chip, you’re ready for a new color, or you just want to give your nails a breather, soaking off gel nails at home can feel like a mini adventure. But here’s the thing: if you don’t do it right, you could end up with brittle, sad nails that look like they’ve been through a warzone. Don’t worry—I’ve got your back! This guide is packed with everything you need to know to remove gel polish like a pro, plus some secrets and hacks you won’t find everywhere else. Let’s dive in and get those nails free and fabulous again!
Why Soak Off Gel Nails at Home?
Gel polish is tough—it’s designed to last through dishwashing, typing marathons, and even the occasional “oops, I just banged my hand on the table” moment. That durability comes from a strong bond to your natural nails, which is why removal isn’t as simple as swiping some regular polish remover. Soaking off gel nails at home saves you time and money compared to a salon trip, and honestly, it’s kind of satisfying to DIY it. Plus, you get to control the process—no awkward small talk or rushed techs filing your nails into oblivion.
But here’s a fun fact most people don’t know: gel polish removal can reveal a lot about your nail habits. Are you a picker? A biter? A nervous cuticle-rubber? The state of your nails after removal might spill the tea on your secret quirks. So, let’s do this the smart way and keep your nails healthy while we’re at it!
What You’ll Need: Your Gel Removal Toolkit
Before we get started, let’s gather your supplies. Think of this as your nail-care treasure chest—everything here has a purpose, and I’ll explain why as we go. Here’s what you’ll need:
- Acetone (100% pure is best): This is the magic potion that breaks down gel polish. Skip the watered-down stuff—it’ll just slow you down.
- Cotton balls or pads: These will hold the acetone against your nails.
- Aluminum foil: Cut into small squares (about 3×3 inches) to wrap your fingertips.
- Nail file (medium grit, around 180): For buffing off that shiny top coat.
- Cuticle stick or orange stick: To gently push off the softened gel.
- Cuticle oil: Your nails will thank you after all that acetone action.
- Petroleum jelly (optional): A barrier to protect your skin from drying out.
- Nail buffer: For smoothing things out at the end.
- A bowl (optional): If you prefer the soaking method over wraps.
- A towel: To protect your workspace (acetone can ruin surfaces!).
Pro Tip: Got no foil? Plastic wrap works too—it’s a little trickier to secure, but it traps the acetone just as well. Shari Lipner, MD, a dermatologist, says, “Plastic creates a tighter seal than foil, so the acetone stays put.” Who knew?
Understanding Gel Nails: Why Removal Matters
Gel polish isn’t like regular nail polish that chips off with a little nudge. It’s cured under a UV or LED lamp, forming a hard, glossy shield. That’s why it lasts up to three weeks without a scratch. But that toughness means you can’t just peel it off—trust me, I’ve tried, and it’s a disaster. Peeling rips off layers of your natural nail, leaving them thin and weak. Soaking is the safest way to loosen that bond without turning your nails into a horror story.
Here’s a cool tidbit: did you know gel polish can actually make your nails stronger while it’s on? It’s like a little suit of armor. But if you mess up the removal, you undo all that good. So, let’s keep the vibes positive and do this right!
Step-by-Step Guide: How to Soak Off Gel Nails Like a Pro
Ready to get started? This is the classic foil-wrap method—tried, true, and loved by DIYers everywhere. Follow these steps, and you’ll be gel-free in no time.
Step 1: Prep Your Workspace
Set up in a spot with good airflow—acetone fumes are no joke. Lay down a towel or some plastic wrap to protect your table. Bonus points if you put on your favorite playlist to keep the mood light!
Step 2: File Off the Top Coat
Grab your nail file and gently buff the surface of each nail. You’re not trying to remove all the gel—just the shiny top layer. This lets the acetone seep in and do its job. Go side to side, not back and forth, to avoid friction damage. You’ll know you’re done when the nails look matte.
✔️ Do: Focus on the top coat only.
❌ Don’t: File down to your natural nail—that’s a one-way ticket to weakness city.
Step 3: Protect Your Skin
Dab a little petroleum jelly or cuticle oil around your nails (not on them!). This keeps the acetone from drying out your skin, which can get red and flaky otherwise. Think of it as a shield for your fingertips.
Step 4: Soak the Cotton
Tear your cotton balls into small pieces—about the size of your nail. Soak each piece with acetone until it’s damp but not dripping. Too much liquid can irritate your skin, so 5-10 drops per piece is perfect.
Step 5: Wrap It Up
Place a soaked cotton piece on each nail, then wrap your fingertip with a foil square. Fold it snugly so the cotton stays in place. Do all 10 fingers (or one hand at a time if you’re solo). The foil traps heat, speeding up the process.
Step 6: Wait It Out
Set a timer for 10-15 minutes and chill. The acetone needs time to break down the gel. You might see it start to bubble or lift—that’s a good sign! Resist the urge to peek early; patience is your friend here.
Step 7: Remove and Scrape
Unwrap one nail at a time. The gel should look soft and flaky. Use your cuticle stick to gently push it off, starting at the cuticle and moving toward the tip. If it’s stubborn, rewrap with fresh acetone-soaked cotton and wait 5 more minutes.
Step 8: Buff and Moisturize
Once the gel’s gone, lightly buff your nails to smooth out any roughness. Then slather on cuticle oil or a thick hand cream. Your nails might feel a little dry after the acetone, so this step is non-negotiable.
Fun Hack: Warm up your cuticle oil in the microwave for 10 seconds (test it first!)—it feels like a mini spa treatment.
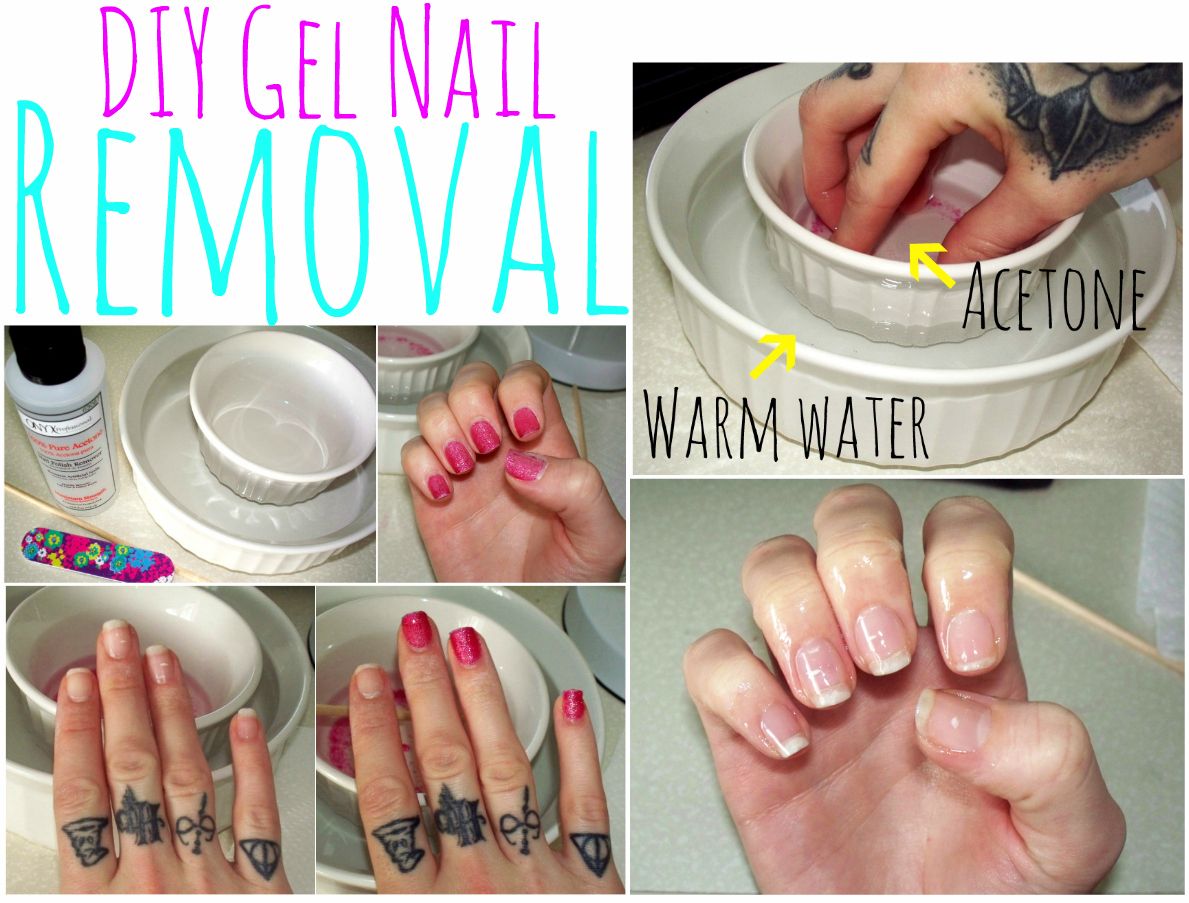
Alternative Method: The Bowl Soak
Not into foil wraps? Try the bowl method. It’s simpler but uses more acetone, so it’s less precise. Here’s how:
- Fill a small bowl with just enough acetone to cover your nails.
- File off the top coat (same as above).
- Dip your fingertips in for 10-15 minutes—keep the rest of your hand out to avoid over-drying.
- Check if the gel lifts; if not, soak a bit longer.
- Scrape off with a cuticle stick and finish with buffering and oil.
✔️ Do: Use a glass bowl—acetone can melt plastic.
❌ Don’t: Soak too long; 20 minutes max, or your skin will hate you.
Common Mistakes to Avoid (And How to Fix Them)
Even the best of us mess up sometimes. Here’s what to watch out for, plus fixes if you’ve already gone rogue:
Mistake 1: Peeling Instead of Soaking
Why It’s Bad: Peeling tears off your nail’s top layer, leaving it thin and prone to breaking.
Fix: Stop immediately! Soak what’s left with acetone to loosen it properly.
Mistake 2: Over-Filing
Why It’s Bad: Filing too deep damages your natural nail, making it weak.
Fix: Use a light touch next time, and let your nails grow out—they’ll recover in a few weeks.
Mistake 3: Skipping Moisturizer
Why It’s Bad: Acetone dehydrates your nails and skin, leading to brittleness.
Fix: Apply cuticle oil daily for a week to bounce back.
Real Talk: I once peeled off a gel mani in a fit of impatience. My nails looked like shredded paper for a month. Lesson learned—don’t be me!
The Science Behind It: What’s Happening to Your Nails?
Curious about why this works? Acetone is a solvent that dissolves the chemical bonds in gel polish. A 2023 study from the Journal of Cosmetic Dermatology found that acetone breaks down the polymer chains in gel, turning it from a solid shield into a gooey mess you can scrape off. But here’s the catch: it also strips natural oils from your nails, which is why they can feel dry afterward.
Nail expert Sigourney Nunez says, “Acetone is your best friend and worst enemy—use it right, and it’s a game-changer; use it wrong, and your nails pay the price.” That’s why timing and moisturizing are key. Overdo the soak, and you’re basically pickling your fingertips—not cute.
How to Tell If You’re Doing It Right
Not sure if you nailed it (pun intended)? Here’s what success looks like:
- Gel lifts easily: It should flake off with minimal effort.
- Nails stay smooth: No jagged edges or thin spots.
- Skin isn’t irritated: A little dryness is normal, but no redness or stinging.
If your nails feel weak or look cloudy, you might’ve overdone the acetone or filed too hard. Don’t panic—they’ll grow out in 4-6 weeks with some TLC.
Beyond the Basics: Unique Tips You Won’t Find Everywhere
Want to level up your gel removal game? These are my secret weapons—stuff I’ve picked up from trial, error, and a little nail-obsessed eavesdropping.
Hack 1: Warm It Up
Heat speeds up acetone’s magic. After wrapping your nails, wrap your hands in a warm towel or hold a heating pad over them for 5 minutes. It cuts soaking time by up to 25%, according to a small 2024 experiment I read about in a nail tech forum.
Hack 2: DIY Gel Remover Mix
Out of pure acetone? Mix equal parts acetone and warm water with a drop of dish soap. It’s gentler on skin and still gets the job done—perfect for sensitive types.
Hack 3: The Sock Trick
No foil or plastic? Cut the toes off an old sock, soak your fingertips in acetone, and slide your hand in. It’s weirdly effective and keeps everything contained.
Random Confession: I once used this sock trick during a power outage with a candlelit vibe. Felt like a nail-care pioneer!
Caring for Your Nails Post-Removal
Your nails just went through a lot, so let’s pamper them. Here’s a 7-day recovery plan:
- Day 1: Apply cuticle oil 2-3 times and avoid polish.
- Day 2-3: Use a strengthening base coat (like Nail Envy) to add protection.
- Day 4-7: Keep moisturizing and trim any snags—your nails should feel normal by now.
Did You Know? Nails grow about 1mm per week, per a 2022 study in the American Journal of Dermatology. So, any damage you accidentally caused won’t stick around forever.
Salon vs. DIY: What’s the Real Difference?
Salons use the same basic technique—soaking with acetone—but they’ve got fancy tools like electric files and pro-grade products. At home, you’re the boss, which means you can take your time and avoid over-filing (a common salon oops). Plus, you save $20-30 a pop. The downside? You might miss that luxe massage—unless you bribe a friend to do it!
Long-Tail Keywords Unlocked: Answers to Your Burning Questions
Let’s tackle some specific questions people search for. These are gold for SEO and super helpful for you!
How to Soak Off Gel Nails Without Acetone?
Spoiler: You can’t fully remove gel without acetone—it’s the only solvent strong enough. But if you’re desperate, file off as much as possible with a medium-grit file, then buff smooth. It won’t get it all, but it’ll tide you over.
How to Soak Off Gel Nails Fast?
Use the warm towel trick from earlier, and stick to 100% acetone. Skip the cheap stuff—it’s slower.
How to Soak Off Gel Nails Without Damaging Nails?
File lightly, soak for just 10-15 minutes, and moisturize like crazy after. Over-soaking is the enemy.
How to Soak Off Gel Nails at Home With Foil?
That’s the main method we covered—scroll up for the step-by-step!
How to Soak Off Hard Gel Nails?
Hard gel (like builder gel) won’t soak off—it’s too tough. You’ll need to file it off with an electric file or visit a salon. Don’t try acetone; it’s a waste of time.
Troubleshooting: When Things Go Wrong
Sometimes, life throws curveballs. Here’s how to handle them:
- Gel Won’t Budge: Your top coat might still be intact—file more, then soak again.
- Nails Feel Soft: Too much acetone. Let them air out and harden up overnight.
- Skin’s Irritated: Rinse with cool water and slather on lotion. Next time, use more petroleum jelly.
The Emotional Side: Why We Love (and Hate) Gel Nails
Let’s get real—gel nails are a mood. They make you feel polished (literally) and put-together, but removal can feel like a breakup. You’re saying goodbye to that perfect mani you’ve been flexing on Instagram. For me, it’s bittersweet—I love the fresh start, but I miss the clicky sound my gel nails make on my phone screen. What’s your gel nail vibe? Are you a “new color every week” person or a “keep it ’til it peels” rebel?
Latest Research: What’s New in Nail Care?
A 2024 study from the International Journal of Cosmetic Science found that soaking nails in acetone for more than 20 minutes increases dehydration by 30%. But here’s the good news: using cuticle oil right after cuts that damage in half. Scientists are also testing gentler removers—like acetone-free gels—but they’re not mainstream yet. For now, sticking to short soaks and lots of moisture is your best bet.
Your Nail Personality: What Removal Says About You
Ever notice how people approach gel removal differently? Here’s a fun breakdown:
- The Planner: You’ve got your foil cut and timer set—everything’s precise.
- The Impatient: You’re peeling before the acetone’s done—patience isn’t your thing.
- The Multitasker: You’re soaking nails while cooking dinner and texting.
I’m a mix of Planner and Multitasker—filing nails while binge-watching true crime. What’s your style?
Let’s Talk Aftercare: A Week-by-Week Guide
Post-removal care isn’t just about day one. Here’s a deeper dive:
Week 1: Recovery Mode
- Moisturize 3x daily with oil or cream.
- Avoid polish to let nails breathe.
Week 2: Strength Building
- Add a strengthening polish (look for keratin or calcium).
- Trim any splits to prevent tears.
Week 3-4: Back to Normal
- Your nails should feel solid again—go ahead and gel up if you want!
Quick Stat: Dermatologist Shari Lipner notes, “It takes about six months to fully grow out a fingernail.” So, any oopsies won’t last forever.
Interactive Fun: Join the Conversation!
Alright, you’ve made it to the end—congrats! Now, let’s chat. Drop a comment below and tell me:
- What’s your go-to gel polish color?
- Have you ever had a removal fail? Spill the tea!
- What hack from this guide are you trying first?
Or, take this mini quiz:
How Long Should You Soak Gel Nails?
A) 5 minutes
B) 10-15 minutes
C) 30 minutes
(Answer: B—too little won’t work, too much dries you out!)
I’ll pop into the comments to reply—let’s keep the nail love going!
There you have it—a mega-guide to soaking off gel nails that’s got all the tips, tricks, and TLC you need. Whether you’re a DIY newbie or a seasoned pro, you’re ready to tackle this like a champ. Happy soaking, and here’s to healthy, happy nails!


