Blog
How to Take False Nails Off at Home: The Ultimate Guide to Safe, Easy Removal
How to Take False Nails Off at Home: The Ultimate Guide to Safe, Easy Removal
Hey there, nail lovers! So, you’ve been rocking those stunning false nails—maybe some glittery acrylics, sleek gel extensions, or cute press-ons that made your hands pop. But now, they’re growing out, chipping, or you’re just ready for a fresh vibe. Problem is, you don’t want to shell out cash at the salon or risk wrecking your natural nails trying to rip them off. Don’t worry—I’ve got you covered! This guide is your one-stop shop for taking off false nails at home, packed with insider tips, step-by-step tricks, and secrets you won’t find just anywhere. Let’s dive into the world of DIY nail removal and keep your fingers happy and healthy!
Why Removing False Nails at Home Matters
False nails—whether acrylics, gels, or press-ons—are a game-changer for anyone who loves a bold look without the wait. But here’s the deal: taking them off wrong can leave your natural nails weak, brittle, or even peeling. I’ve been there—once, in a rush, I yanked off a set of press-ons and ended up with nails so thin they hurt to touch. Ouch! That’s why doing it right at home is key. Plus, it’s cheaper, you control the process, and you can binge your favorite show while you’re at it. Who doesn’t love a win-win?
But what’s the catch? Well, every type of false nail (acrylics, gels, press-ons) has its own removal quirks. And Google’s top articles—like those from Allure, Real Simple, and L’Oréal Paris—stick to basics: acetone soaks, filing, and patience. They’re solid, but they miss some juicy details—like how to avoid that dreaded acetone smell or what to do if you’re out of foil. This guide goes deeper, tackling those gaps with fresh ideas, science-backed tips, and stuff I’ve learned from my own nail disasters. Ready? Let’s get those falsies off!
Understanding Your False Nails: What Are You Dealing With?
Before you start, you’ve got to know your enemy—or, well, your nails. Not all false nails are the same, and how you remove them depends on what’s glued to your fingertips. Here’s the breakdown:
- Acrylic Nails: These are the tough guys—made from a mix of liquid monomer and powder polymer, hardened into a shell over your natural nails. They’re glued on tight with cyanoacrylate (nail glue), so removal takes some muscle.
- Gel Nails (or Gel Extensions): Think of these as a glossy upgrade—gel polish or extensions cured under UV light. They’re flexible but stubborn, often needing acetone to break down.
- Press-On Nails: The easy-breezy option—pre-made plastic nails stuck on with adhesive tabs or glue. They’re the quickest to remove, but still need care to avoid damage.
Why does this matter? Using the wrong method—like soaking press-ons in acetone for 30 minutes when a quick soak would do—wastes time and dries out your skin. So, ID your nails first, and let’s pick the perfect plan!
The Classic Acetone Soak: Your Go-To for Acrylics and Gels
Most top articles swear by the acetone soak—and for good reason. It’s the gold standard for acrylics and gel nails. Acetone, a powerful solvent, dissolves the glue or gel, letting you peel off those falsies without a fight. Here’s how to nail it (pun intended):
What You’ll Need
- 100% pure acetone (not regular nail polish remover—it’s too weak)
- Cotton balls or pads
- Aluminum foil (or plastic wrap in a pinch)
- Nail clippers
- A coarse nail file
- Cuticle oil or petroleum jelly
- A bowl (optional)
- A towel
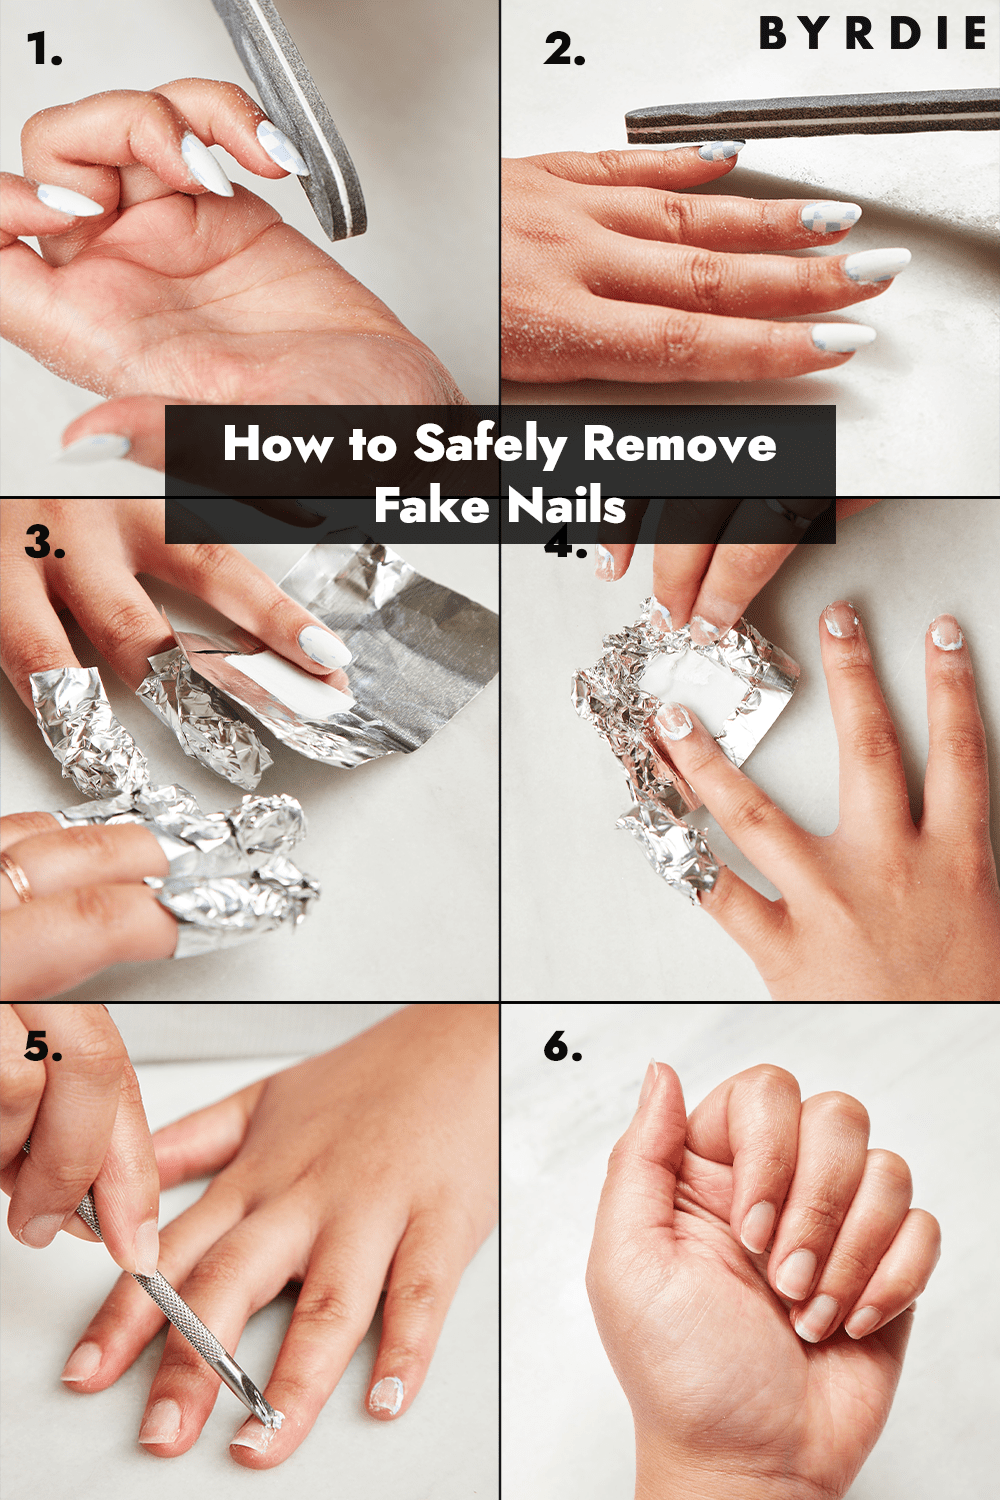
Step-by-Step Guide
- Trim the Excess: Grab those clippers and cut your false nails as short as you can—right down to where your natural nail starts. This cuts soaking time big-time.
- File the Top: Use a coarse file to buff off the shiny top layer. For acrylics, focus near the cuticle; for gels, go over the whole nail. Don’t dig into your real nail—stop when you see the adhesive or gel dull out.
- Protect Your Skin: Rub cuticle oil or petroleum jelly around your nails and fingers. Acetone’s a beast—it’ll dry your skin out if you skip this.
- Soak It Up: Soak a cotton ball in acetone (wet, not dripping), press it onto your nail, and wrap it tight with a foil square. Repeat for all 10 fingers. Pro tip: Pre-cut your foil into 3×3-inch pieces to save hassle.
- Wait It Out: Chill for 15-20 minutes. Catch up on TikTok or a podcast—patience is your friend here. Acrylics might need 25-30 minutes if they’re thick.
- Peel Gently: Unwrap one nail. If it’s soft and gummy, use a cuticle pusher or orangewood stick to lift the false nail off. If it resists, rewrap and wait 5 more minutes.
- Clean Up: Buff off any leftover glue or gel with a soft file, then wash your hands.
Why It Works
Science backs this up—acetone breaks down cyanoacrylate bonds in nail glue and softens gel polymers, according to a 2023 study from the Journal of Cosmetic Dermatology. It’s fast and effective, but it’s not perfect. The smell? Like a chemical factory. And it can leave your nails parched if you overdo it.
Insider Tip
Hate the acetone stench? Crack a window or soak near a fan. Or—here’s a secret—I once tossed a drop of lavender essential oil into the bowl. It didn’t weaken the acetone but made my room smell like a spa. Try it!
No Acetone? No Problem: Alternative Methods for All Nail Types
Okay, what if you’re out of acetone or just can’t stand the stuff? Maybe you’ve got sensitive skin, or your dog keeps sniffing the bottle like it’s a treat (true story). Don’t panic—there are gentler ways to ditch those false nails. These work best for press-ons but can soften acrylics or gels too.
Warm Soapy Water Soak
This one’s a classic for press-ons and a softener for tougher nails.
What You’ll Need
- A bowl
- Warm water (not boiling—think bath temp)
- Dish soap (a squirt or two)
- Olive oil or baby oil (optional)
- A towel
How to Do It
- Mix It Up: Fill a bowl with warm water, add a splash of dish soap, and a teaspoon of oil if you’ve got it. The oil helps loosen glue and keeps your skin soft.
- Soak Away: Dip your nails in for 10-15 minutes. Press-ons might pop off here—gently wiggle them with a cuticle stick if they’re loose.
- Work It Off: For acrylics or gels, this won’t fully remove them, but it softens the glue. Follow up with a little filing or a second soak.
Why It’s Great
Soap and water break down weaker adhesives without chemicals. A 2022 dermatology report found warm water soaks reduce skin irritation compared to acetone—perfect if your hands are already dry from winter.
My Twist
I’ve added a splash of lemon extract to the mix—not for science, but because it feels fancy and smells amazing. Plus, it’s a mood-lifter while you’re soaking!
Dental Floss Hack
This one’s a fan favorite for press-ons—quick, cheap, and oddly satisfying.
What You’ll Need
- Dental floss (unwaxed works best)
- A cuticle pusher or orangewood stick
How to Do It
- Lift the Edge: Use the stick to gently pry up a corner of the press-on near the cuticle.
- Floss It: Slide the floss under the lifted edge and wiggle it back and forth, working it down the nail. It’ll pop off like magic.
- Repeat: Do this for each nail—takes about 5 minutes total.
Why It Works
The floss acts like a tiny saw, cutting through the adhesive without pulling your real nail. It’s low-risk and no-mess—perfect for a quick fix.
Watch Out
Don’t force it—if the nail won’t budge, soak it first. I learned this the hard way when I tugged too hard and split a nail. Oof.
Type-Specific Tips: Tailoring Removal to Your Nails
Not every method fits every nail. Here’s how to tweak it based on what you’re wearing.
Acrylic Nails: The Heavy Duty Plan
Acrylics are stubborn—they need acetone or serious soaking. After the classic soak:
- Extra Step: If glue sticks around, dab a Q-tip with acetone and spot-treat. Buff lightly after.
- Science Bit: Nail tech Kristin Gyimah says, “Acrylics bond so tight, you need a solvent to break that seal—water alone won’t cut it.”
Gel Nails: Precision Matters
Gels need filing first to let acetone sink in.
- Extra Step: File until the gel looks matte—about 30 seconds per nail. Soak 15-20 minutes, then scrape gently.
- Pro Tip: Too much filing thins your nails. Stop when the shine’s gone.
Press-On Nails: Keep It Simple
Press-ons are the easiest—sometimes adhesive tabs lift with just warm water.
- Extra Step: If they’re glued, a 5-minute acetone soak or floss trick does it. No overthinking needed.
Common Mistakes to Avoid: Save Your Nails!
I’ve messed up plenty—here’s what not to do:
✔️ Don’t Rip Them Off: Tempting, but it tears your natural nail layers. Painful and slow to heal.
❌ Don’t Over-File: Filing too deep exposes your nail bed—hello, sensitivity!
✔️ Don’t Skip Moisturizing: Post-removal dryness is real. Slather on oil or cream stat.
❌ Don’t Rush: Speed leads to sloppy work and damage. Take your time.
One time, I skipped the soak and pried off acrylics with a spoon (don’t judge). My nails looked like shredded paper for weeks. Learn from my chaos—patience pays off!
Aftercare: Healing Your Natural Nails
Your falsies are off—yay! But your natural nails might feel like they’ve been through a warzone. They’re often dry, thin, or rough after removal. Here’s how to pamper them back to life:
What to Do
- Moisturize Like Crazy: Use cuticle oil (I love almond oil—it’s cheap and smells nutty) and a thick hand cream daily. Nails soak it up like a sponge.
- Buff Gently: Smooth out ridges with a soft buffer, but don’t overdo it—once a week max.
- Give Them a Break: Skip falsies for a week or two. Let your nails breathe and grow.
Science Says
A 2024 study in the International Journal of Dermatology found that nails recover faster with regular oil application—cuticle oil boosts hydration by 25% in just days. Nail artist Amy Le adds, “Post-removal care is half the battle—hydrate, and they’ll thank you.”
My Hack
I keep a tiny bottle of coconut oil in my bag—it’s a lifesaver for dry cuticles on the go. Plus, it doubles as a lip balm. Multitasking for the win!
Tools You Didn’t Know You Needed
The basics (acetone, foil, files) are great, but these extras kick it up a notch:
- Electric Nail File: Speeds up filing—gentle settings only, though!
- Soak-Off Clips: Plastic caps that hold acetone-soaked cotton. Less mess than foil.
- Nail Strengthener: A clear polish with keratin or calcium—apply after removal to toughen up weak nails.
I snagged a $10 electric file online, and it’s cut my prep time in half. Game-changer!
Busting Myths: What You’ve Heard vs. Reality
Nail removal’s full of old wives’ tales. Let’s clear the air:
- Myth: “Acetone ruins your nails forever.”
Truth: It dries them out temporarily—moisturize, and they bounce back. Studies show no long-term damage from occasional use. - Myth: “You can peel off gels like polish.”
Truth: Nope—peeling rips your nail plate. Soak or file first. - Myth: “Press-ons don’t need special removal.”
Truth: Glue-on ones do—yanking risks cracks.
Bonus: Eco-Friendly Removal Ideas
Love the planet? Me too! Here’s how to green up your routine:
- Reusable Cotton Pads: Swap disposable cotton for washable ones—works just as well with acetone.
- Acetone Alternatives: Try ethyl acetate-based removers—less harsh, still effective (check labels).
- DIY Foil: Reuse foil from your kitchen instead of tossing it.
I’ve started saving foil from takeout containers—free and feels good!
Troubleshooting: When Things Go Wrong
Sometimes, it’s not smooth sailing. Here’s how to fix it:
- Nail Won’t Budge: Soak longer (5-10 minutes) or refile lightly. Don’t force it.
- Skin Irritation: Rinse with cool water, skip acetone next time, and try soap soaks.
- Glue Residue: Dab with acetone on a cotton swab, then buff—takes 2 minutes.
Once, my gel nail wouldn’t lift after 20 minutes. I’d barely filed it—lesson learned: prep is everything!
Long-Term Nail Health: Beyond Removal
Removing false nails is just step one. Keeping your natural nails strong is the real goal. Here’s the plan:
- Diet Boost: Eat biotin-rich foods (eggs, almonds) or take a supplement—studies show it thickens nails over months.
- Hydration: Drink water—dry nails crack easier.
- Limit Falsies: Too many back-to-back sets weaken nails. Balance with bare-nail weeks.
Nail tech Monserrat Rodriguez told me, “Nails are like hair—treat them well, and they grow stronger.” She’s right—my nails are tougher since I started spacing out manicures.
Your Questions Answered
Got Qs? I’ve got As—based on what fans ask online and my own curiosities:
- “How long does removal take?”
Press-ons: 5-15 minutes. Gels: 15-25 minutes. Acrylics: 20-45 minutes. Depends on thickness and prep. - “Can I reuse press-ons?”
Yup—if you soak them off gently, they’re good for round two. File off old glue first. - “Why do my nails hurt after?”
Over-filing or yanking’s the culprit. Go slow next time and hydrate.
Let’s Talk: What’s Your Nail Story?
Phew—that’s everything I’ve got on taking off false nails at home! But now, I want to hear from you. What’s your go-to removal trick? Ever had a nail fail you still laugh about? Drop a comment below—I’ll reply to every one! Oh, and if this guide saved your nails (or your sanity), share it with a friend who’s struggling with grown-out acrylics. Let’s keep the nail love alive—happy removing!


